The following post was written by James M. Clinton – Product Manager for Force and Material Test Products at Starrett, our featured manufacturer this month. The L.S. Starrett Company, founded in 1880, manufactures more than 5,000 variations of Precision Tools, Gages, Measuring Instruments and Saw Blades for industrial, professional and consumer markets worldwide. Starrett, a leader who has set the standard for fine precision tools in industry for over 130 years, has rightfully earned the title, “World’s Greatest Toolmakers”.
Tensile Testing Principles – Fundamentals, Methods and Challenges
Tensile testing is arguably the most common test method used in both force measurement and material testing. Tensile testing is used primarily to determine the mechanical behavior of a component, part or material under static, axial loading.
The test method for both material testing and force measurement is similar, however the measurement results are different. A tensile test is performed to determine the tensile properties of a material or component. The test sample’s deformation is used to characterize its ductility or brittleness as well as important characteristics such as tensile strength, yield point, elastic limit, percent elongation, elastic modulus and toughness.
Material Testing
Material testing is the science that measures the mechanical properties of materials. It involves methods that quantify and qualify the physical characterization of materials ‒ their strength, their reaction to deformation, and their ability and inability to withstand an applied force for a period of time. Material testing involves measurements for stress and strain, which requires knowing the original cross-sectional area of the sample being tested. Common units of measure are N/mm2, MPa, PSI and %. Test samples are often prepared to a specified size according to an international testing standard from ASTM, ISO, DIN or other organizations. During a tensile test, the sample’s shape changes as load is applied. Understanding the change in the sample’s dimension at various or specified forces helps determine the material’s performance and suitability for a given application or product.
Force Measurement Testing
Force measurement testing is used to test components and products and generally uses units of measure of force: Newtons, pounds-force and kilograms-force. The sample’s cross-sectional area isn’t involved in the measurement result. The most common force measurement is the “peak force” or maximum force value. These tests may also report the associated distance result at the peak force. Force measurement is conducted in the engineering laboratory, in quality control and inspection and on the production floor. Force testing in production has increased substantially in recent years, as more manufacturers recognize the importance of in-situ quality testing as a way to improve productivity, yields and throughput.
Testing Instrumentation
Tensile testing may be performed at a very basic level by simply using a handheld force gage where the gage measures the pull force applied on a sample, product or component in order to determine the maximum force. At the other end of the instrumentation spectrum are extremely sophisticated tensile testing systems equipped with advanced testing software and ancillary instruments, such as extensometers. These testing systems are able to pull the sample under test at a very precise velocity to a very precise target. Large data sampling helps produce high resolution data for both force and distance or stress and strain, so that very accurate measurements can be taken, analyzed and reported.
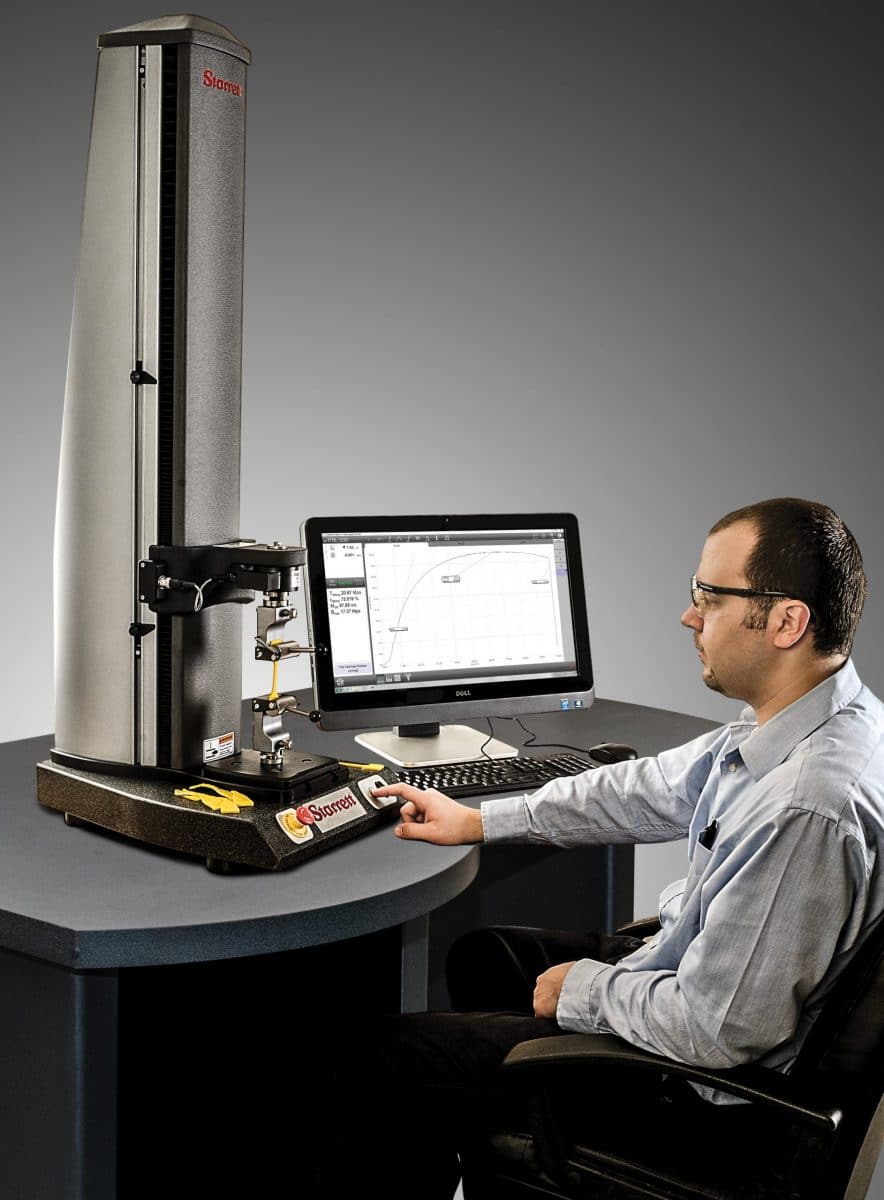
Starrett L3 Systems offer a new and easier solution for creating and performing a test, analyzing test results and managing test data.
Common Tensile Testing Results and Measurements
There are a variety of different tensile testing characteristics that can be discovered and measured. Some of the more common measurements are listed below.
Tensile strength is the maximum stress measured ‒ often during a destructive test. Stress is the amount of force divided by the original cross-sectional area of the sample under test.
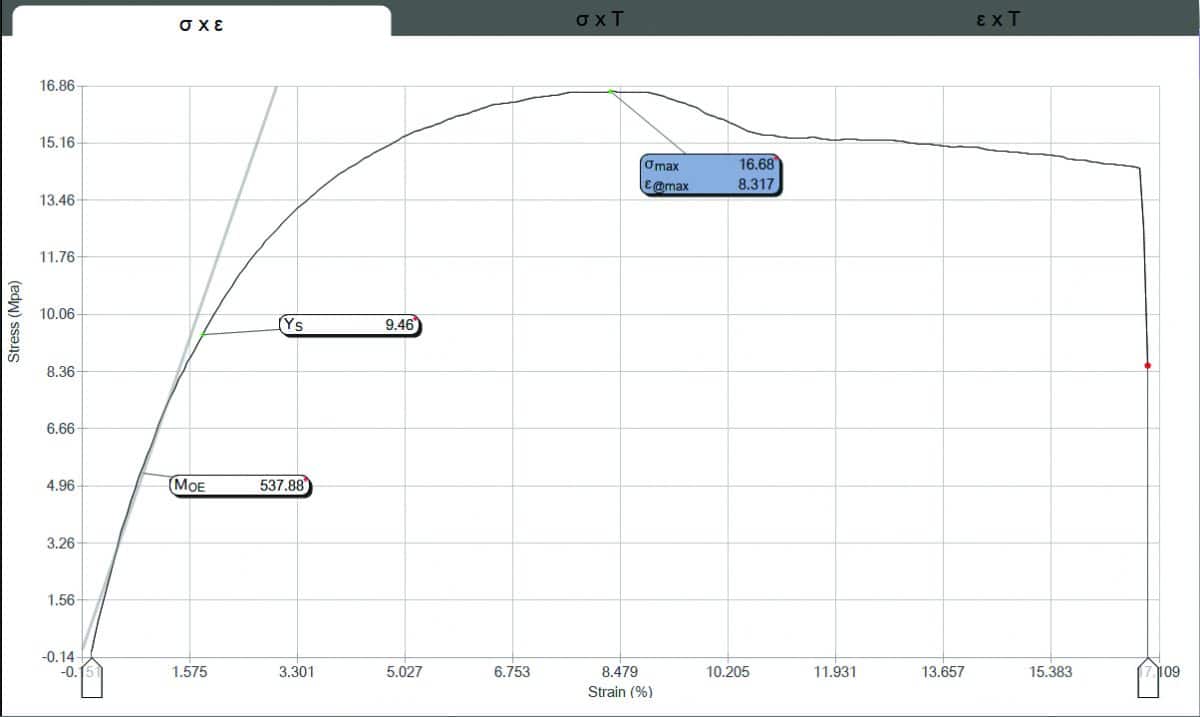
Tensile Strength – The maximum stress observed from the stress-strain curve.
Elasticity is the material’s ability to be pulled to a stress value and when the stress is removed, the material will return to its original length without showing any permanent deformation. A spring is an example of a product that is designed to have a high elasticity.
Elastic Limit is the highest degree of stress the material can withstand before it exhibits a permanent set.
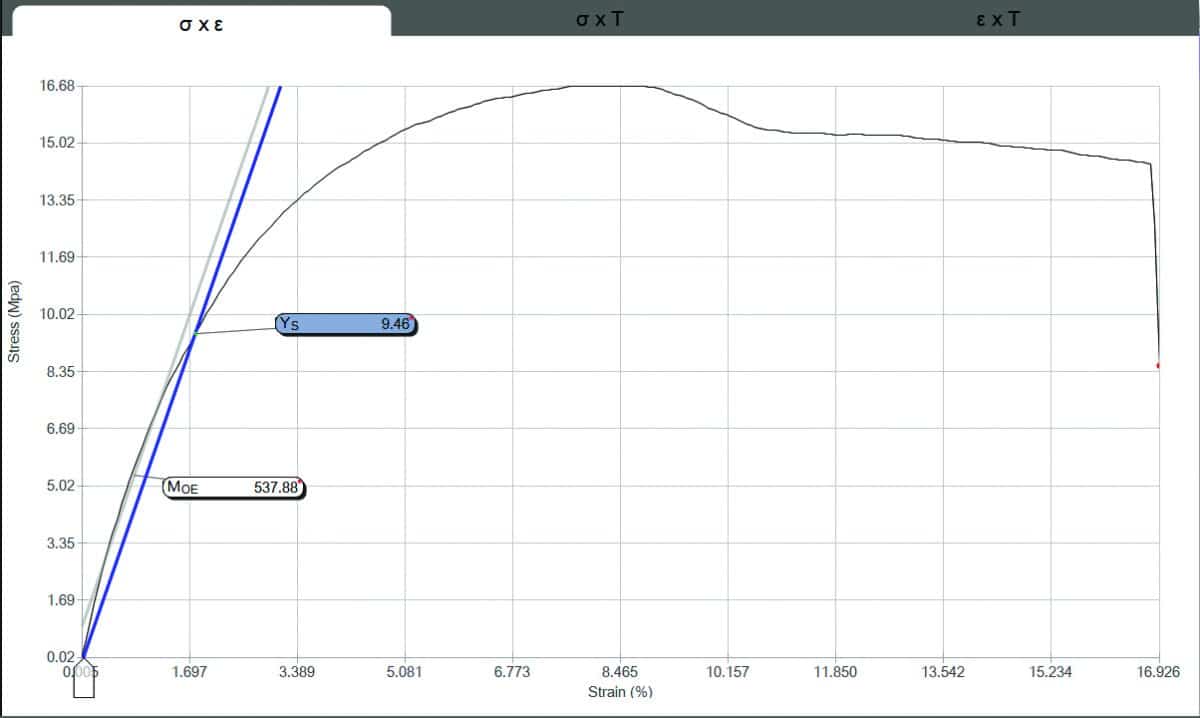
Elastic Limit – The greatest amount of stress the material can have without taking a permanent set.
Yield Strength is defined as the stress where the material under test exhibits a permanent set, i.e., the material has gone beyond its elastic limit. Yield strength is often determined using an arbitrary offset value of 0.2% strain from the elastic slope. A line is drawn parallel with the elastic slope line at an offset of 0.2%. Yield strength is where the offset slope line intersects the stress-strain curve.
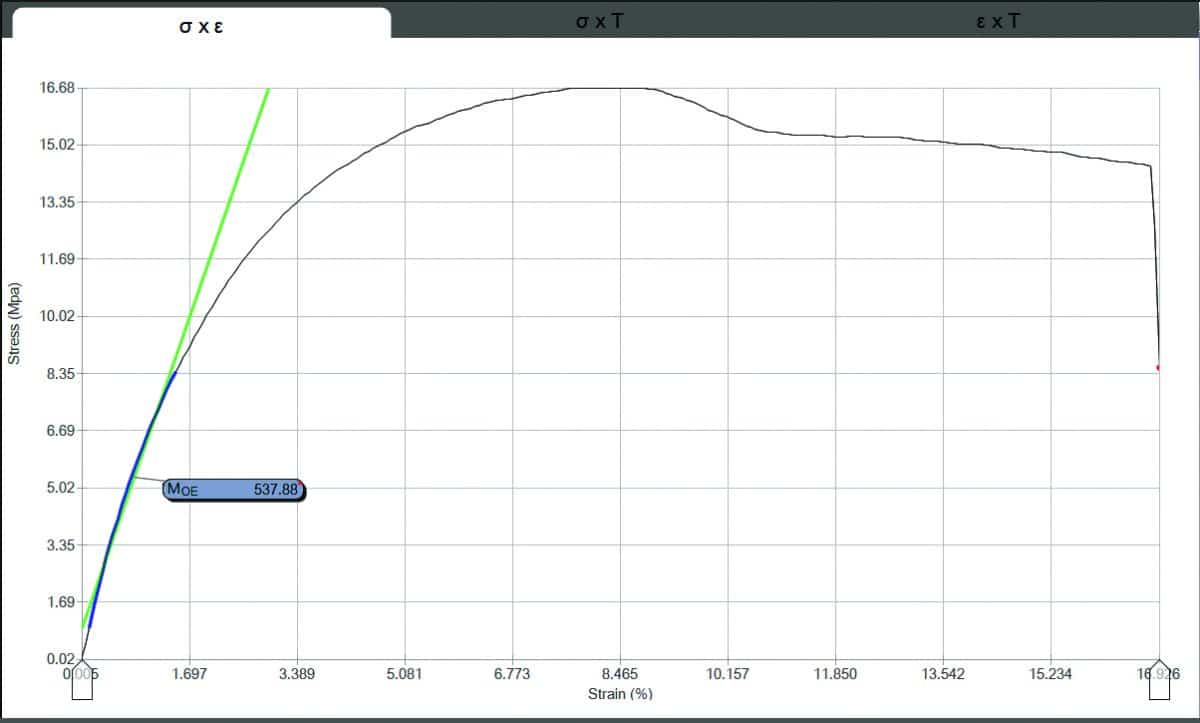
Yield Strength – Using the offset method, yield strength is the stress at which the material exhibits a limiting permanent set based on an arbitrary 0.0002 in/in strain.
Plasticity is similar to elasticity however an element of time is used during the testing. When a material, such as an elastomer is pulled to a force limit and then held for a time duration, the ability of the elastomer to return to its original shape without permanent deformation is its plasticity characteristic.
Resilience is the ability of the material to absorb and store energy during a tensile loading application. It is the energy capacity within the elastic range of a material and is characterized as the area beneath the elastic stress-strain curve, expressed in Joules/m3 or Pascals.
Hysteresis is a material’s loss of energy and its inability to retain its elastic characteristic. Many materials exhibit some degree of hysteresis as they are loaded and unloaded repeatedly over a time duration or number of cycles.
Stiffness is the material’s ability to resist deformation when a force is being applied.
Modulus of Elasticity is the measurement of a material’s stiffness. The more stiffness that is exhibited by a material the less deformation of the material occurs under loading.

Elastic Modulus – The modulus of elasticity represents the stiffness of the material under test. In tensile applications, this modulus is often called Young’s Modulus and is the relationship between stress and strain within the proportional limit.
Elongation is strain. Elongation is the percent of change in length from the sample’s original gage length prior to the force being applied to its ultimate length at an applied force. Strain is a dimensionless value; however, it is sometimes expressed as a percent or as inch/ inch or millimeter/ millimeter.
During tensile testing, the material will deform laterally and axially. Poisson’s Ratio is the comparison of a material’s lateral deformation to the axial or longitudinal deformation.
Tensile Testing Challenges ‒ Causes and Effects
Non-axial Loading is one of the most common causes of incorrect tensile measurements. Even very small off-center loading when using a load sensor or force gage, can result in measurement errors of up to 0.5%. It is therefore, important to ensure that the alignment of the testing string, i.e., the load cell, top test fixture, sample and bottom test fixture are perpendicular to one another.
Using a properly sized force gage or load cell sensor based on the expected load measurement is important to achieving accurate and repeatable results. A general rule is to use a sensor that is between 20% and 80% of the anticipated load measurement. This will avoid or minimize error affects at the low end due to mechanical noise and will help prevent overloading conditions at the upper end of the measurement range. Since most sensors are calibrated and have their accuracy specification based on full scale, the closer you are to zero, the more affect the accepted error has on your measurement.
Having an incorrect test fixture is another common cause to inaccurate tensile measurements. A fixture that is too large for the sample or that applies too much gripping force to the sample during tensile movement can cause the sample to fracture outside the specified gage length area. The test fixture should be sized to the sample’s expected load characteristics. Wedge-action test fixtures work well on ductile samples but tend to be less reliable on brittle materials, since they apply load onto the sample as axial loading increases. Brittle materials tend to test more consistently when pneumatically-operated test fixtures are used that regulate the gripping force onto the sample.
Improper sample preparation can result in inconsistent and incorrect characterization. When testing to a specific international standard, the sample should be prepared to the prescribed dimensions. Force measurement applications will typically use the component in its finished state. Material testing however, uses specially prepared specimens in various forms and shapes. Their cross-sections may be round, rectangular or square and they have a known standard gage length.
Testing at too fast or too slow a velocity is another common reason why tensile measurement may not be optimum. Where available, testing should be done in accordance to a recognized and accepted testing standard by ASTM, ISO, DIN or others. Test speed is clearly specified in these standards and will ensure a proper measurement is taken.
Tensile results may be significantly affected by temperature. Elasticity of a sample can decrease significantly as temperature increases.
Why Use Tensile Testing?
The results of a tensile test should provide helpful data to characterize the physical and mechanical properties of the component or material. Tensile tests will classify the sample’s ductility or brittleness and their elastic and plastic behavior. Tensile testing can determine the component’s or material’s suitability for use and its performance over time. Adoption and adherence to internationally accepted testing standards for tensile testing will aide testing efforts and help ensure products, components or materials meet specified design requirements.
Interested in Tensile Testing Equipment?
Michelli Weighing & Measurement can help with your tensile testing needs. As an authorized Starrett distributor, we can help you obtain the equipment you need to create and perform tests, analyze test results and manage test data. Contact your local Michelli location today to consult with a product specialist and find the perfect match based on your application, or request a quote online today.
